Booklet Layout Design
In this lesson, we will learn to create a booklet layout using only the capabilities of the photoshop program.
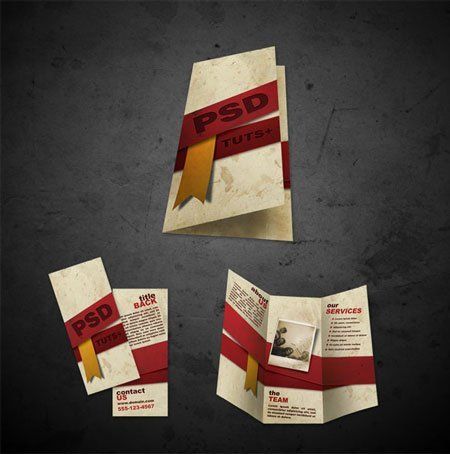
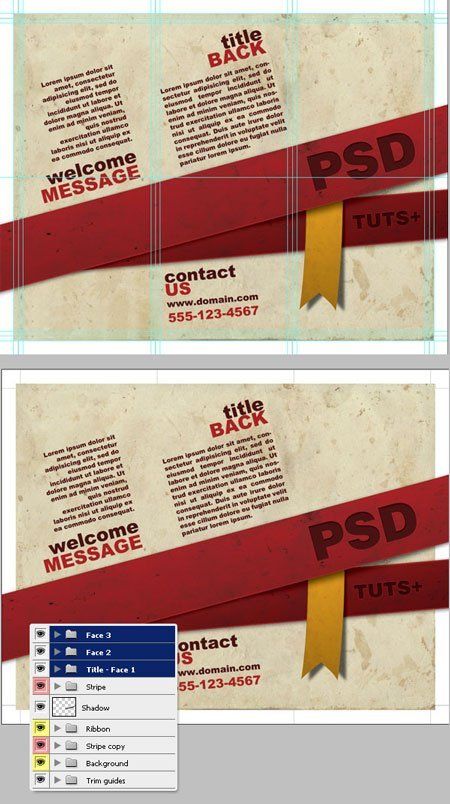
That's what we get at the end of the lesson:

Materials for the lesson:
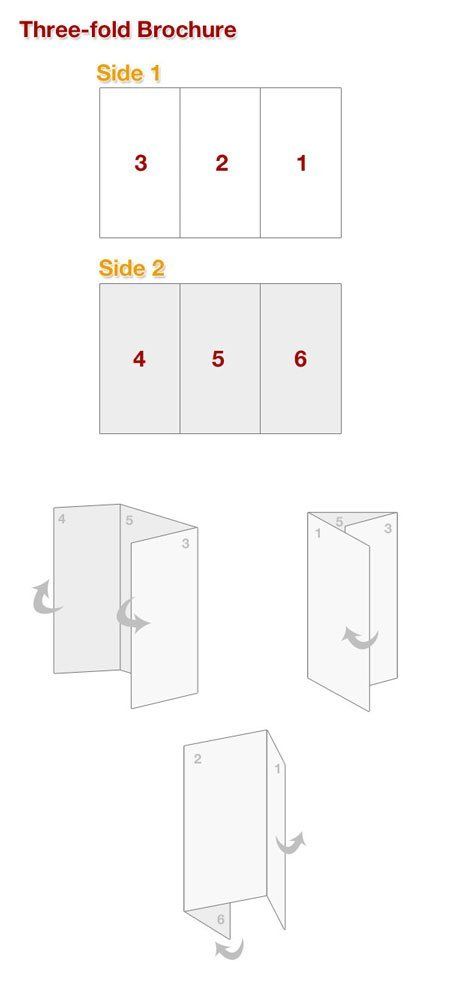
Step 1. There are some things we need to consider before starting to design a brochure: size, shape, and folding type. In general, we must start with a pencil and paper - draw a sketch of our brochure. The brochure will have two sides, it means that there will be two documents in Photoshop - one for the inside of the brochure, another for the cover.
Below is the project of a triple brochure. Let's call each print area "Face", so we will have a "person1", "Person2", ...., "Person6"
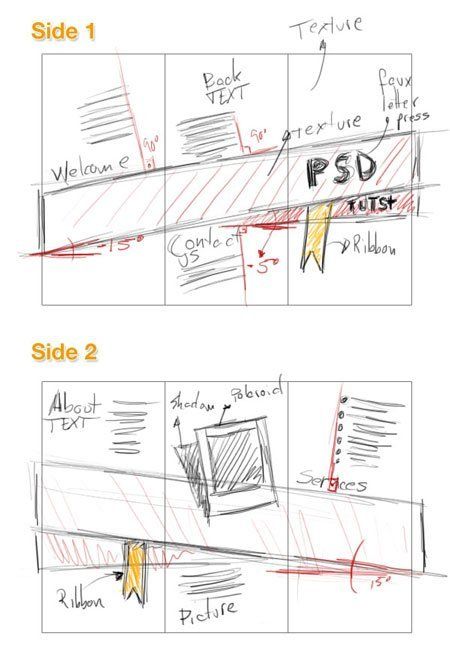
Step 2.. Once you have rolled your sheet of paper, start the design. It is the most creative step, so feel free to apply your fantasy. In the following example, the author used the tablet to show the sketch. It contains the basic principles of work. The sketch will help you develop the entire design and arrange information so that it is available to the reader and in the twisted form.
Party 1.
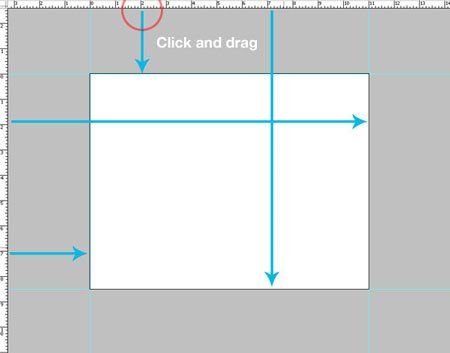
Step 3.. Create a new document. For the print project, the document settings are very important. Then click Ctrl + R.to appear ruler. Now we need guides. Mouse over the ruler the cursor (tool " Move»\\ Move Tool) And by holding the left mouse button, pull one guide from there. Vertically, for example; Do the same horizontally.
* In order to remove the guides, click Ctrl + H.. The same combination, so that they appear again *.
Units of measurement - inches (click on the PCM on the line and from the opening list, select "Inches" (INCES))
![]()
Step 4.. Borders of the workspace. We define the boundaries of our print document. Place the guides on each side of the document.
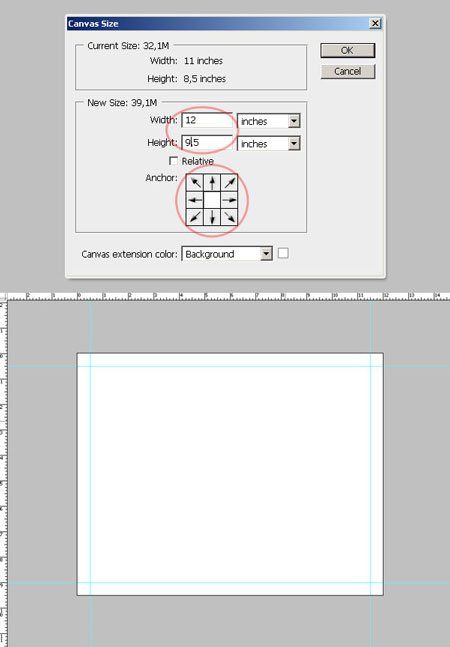
Step 5.. Now increase the document in the menu Image \\ canvas size (Image \\ Canvas Size) - Add an inch to the width and height of the document, in addition, make sure the anchor point is in the middle. As you can see, the document increased by 0.5 inches on each side.
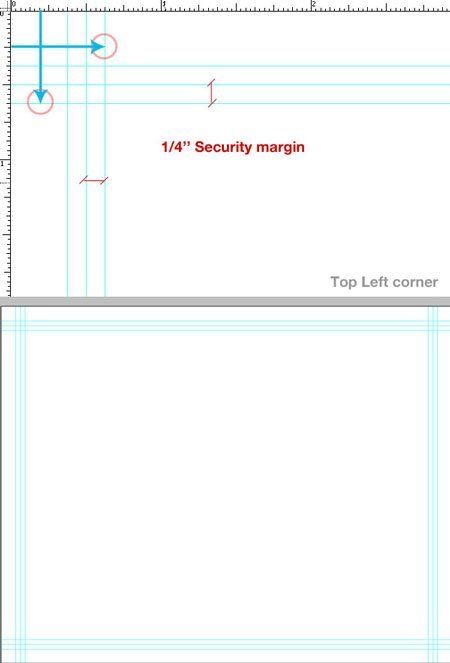
Step 6.. Add a 0.25 inches (this is very important, since the background image should be located inside the printed borders of the document). Pull out the guides and place a 0.25 inches before the previous guides.
Step 7.. Security borders. Even if our trim process is beautiful, there is still another small area that we must leave empty. We will add the security border between the edge of the working document and our project, i.e. we will make an indent. To do this, pull the guides and place 0.25 inches inside our "main area".
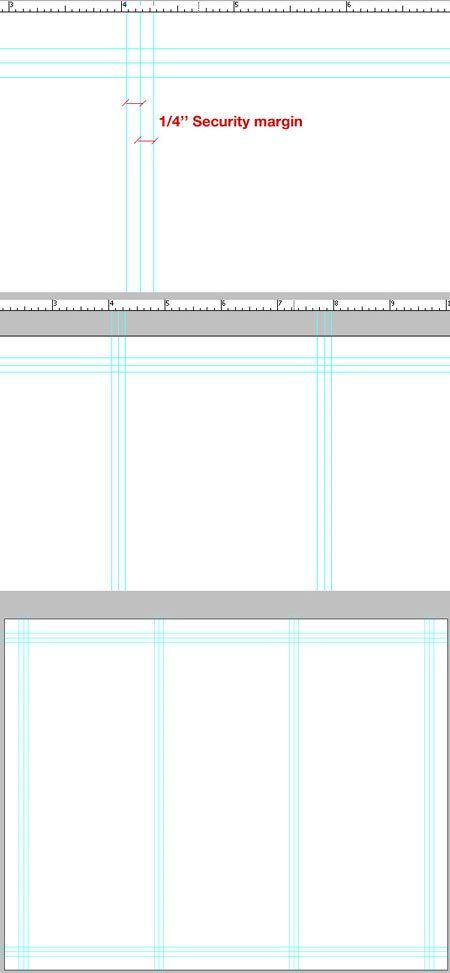
Step 8.. Now we have to make three columns with guides. There are several ways to divide into three parts, one of them - take a calculator and divide 11/3 \u003d 3.66. Select a tool "Rectangle" (Rectangle Tool) (U) In Figures mode and draw a rectangle, as shown below. Accuracy is not important now. Now select the tool "Movement" (Move Tool) (V) Turn on the option panel "Show control elements" (Show Transform Controls) and duplicate the rectangle (for this clamp the key Alt. And move the rectangle). Duplicate the second rectangle. Now we have three rectangles. Change the color of copies (graphic purposes). Now highlight three rectangles (on the palette of the layer, clinging Shift.Click on the layers) and with an active tool "Movement" Pull the right nodes to the right until you reach the right border of the "main area", click ENTER. This process will expand our rectangles in equal proportions. Now select the middle rectangle and install new "columns" guides, remove our rectangles. Our document is divided into three equal parts.
Step 9.. Security edges with folding. This is very important, since the folding is used 2-3 mm when printing, you should not have any graphic objects in this area. Add guides to ¼ inches to the "column" guides on each side. Now you have a great document - a template for further projects, be sure to save.
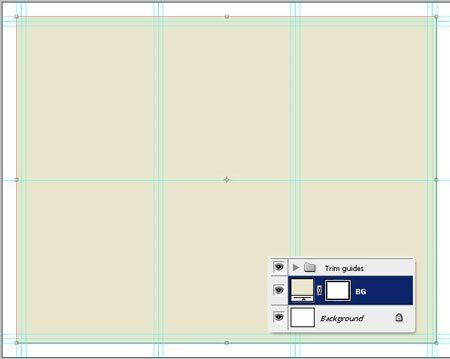
Step 10.. Background. How do you remember, we use a color model CMYK.. Click on the color of the foreground on the colors palette and select the background color. Tool "Rectangle" (Rectangle Tool) (U) Draw a rectangle, as shown below.
![]()
Step 11.. Guide trimming. Set the foreground color as shown below, select the Tool "Line" (Line Tool) and draw lines as shown below.
Step 12.. Place all layers with lines in the group and name it " Trim Guides". Ctrl + G. - Create a group of layers (pre-layers need to be allocated)
Design
Step 13.. The author used the texture to give the background the effect of dirty old paper. The texture can be called in the archive. Transfer the texture to our document to a new layer (using the "Move" tool), place the texture as shown below, name the layer " BG.Texture." Using the tool " Stamp"(Clone Stamp Tool) Remove the marks from ink and change overlay mode (Blending Mode) for layer on Multiplication (Multiply), opacity (OPACITY) for layer 40%.
Step 14.. Select a tool " Rectangle" (Rectangle Tool) (U) in the figures mode and draw a strip, as shown below, the color of any, name the layer " Stripe».
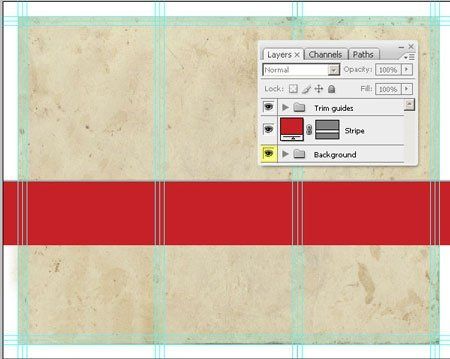
Apply the following layer styles:
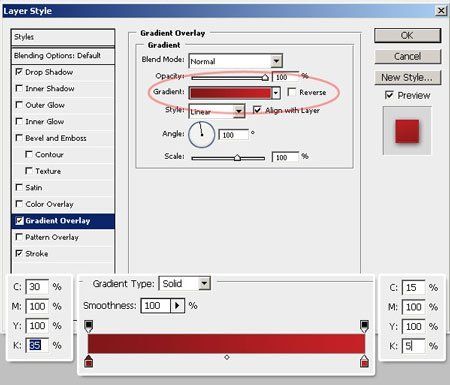
Gradient Overlay \\ Gradient Overlay:
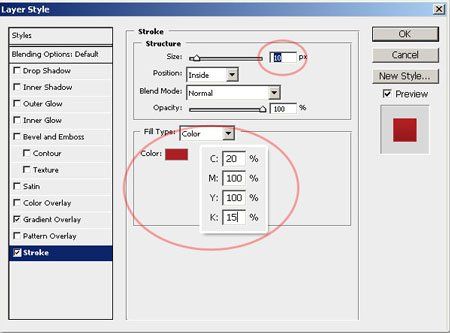
Stroke\\ Stroke:
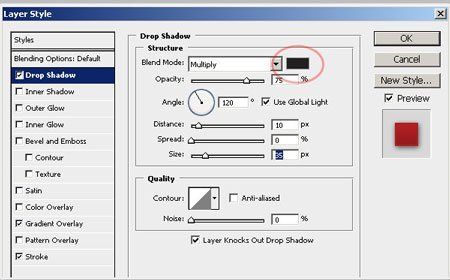
Shadow\\ Drop Shadow:

Step 15.. Press the keyboard key Ctrl +.A.(I will select everything), on the palette of the layer choose the layer " BG.Texture."And copy the selection ( Ctrl +.C.). Make an active layer " Stripe", Create a new layer, name" StripeTexture."And insert the selection ( Ctrl +.V.). Ctrl +.T. and transform the layer " StripeTexture ", As shown below. Staying on the layer " StripeTexture.", Press Ctrl + Clickaccording to the miniature mask layer " Stripe" We invert the selection Allocation \\ inversion (SELECT \\ INVERSE) and click Delete.. Remove the selection Ctrl +.D.. Change overlay mode (Blending Mode) for layer " Stripe Texture." on the Linear dimer (Linear Burn). Create a new group, name « Stripe"And place the" Stripe "and" Stripe Texture "layers there.
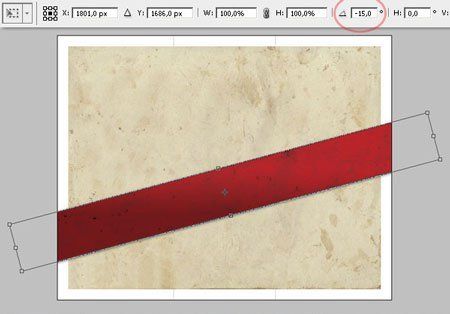
Step 16.. The author decided not to use the vertical location of the bands, and turn them at an angle of 15 ° and 5 °. Select a tool " Movement » (Move Tool) and select the "Stripe" group, Ctrl +.T.Change the angle of inclination -15 °, click ENTER
Pull out another guide.
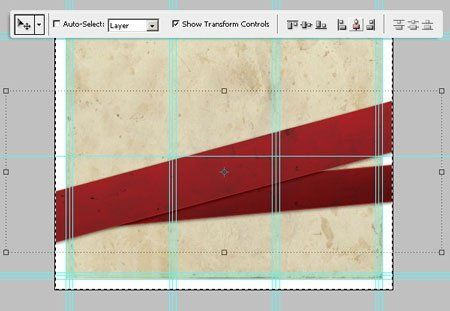
Step 17.. Add the second strip. Select the Stripe group and with an active tool " Movement » (Move Tool), clamp the key Alt. And move the strip (this you copy it). Position the duplicate layer under the original. Ctrl +.T. And turn the copied strip horizontally. Change the Stripe layer style settings: Gradient overlay \\ Gradient Overlay:
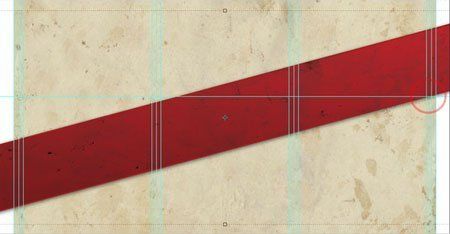
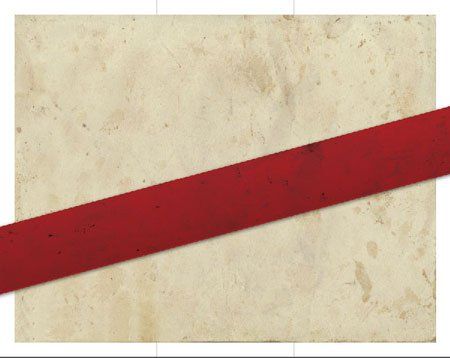
Step 18. Turn the second strip. Ctrl +.T.Change the angle of inclination -5 °, click ENTER And let down this strip down a few millimeters.

Alignment. As the author wants to add a wrapper effect with stripes on the back side, it is very important to put them in the center. We allocate everything ( Ctrl + A.), choose the tool " Movement » (Move Tool), make an active group "Stripe" and on the parameter panel click on the icon " Alignment centers horizontally"ALIGN HORIZONTAL CENTER), remove the selection Ctrl +.D.. Repeat this operation with the Stripe Copy group
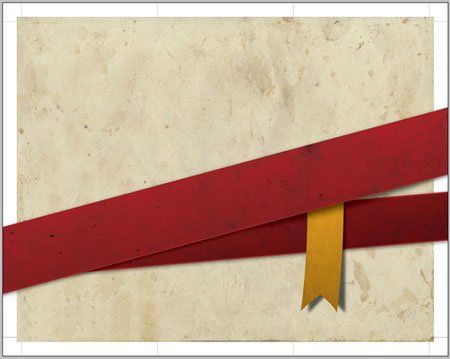
Step 19.. Now we will add yellow ribbon. Create a new group between the "Stripe" and "Stripe Copy" groups and name "Ribbon". Create a new layer, name "ribbon", pull the guide and tool " Rectangle"(Rectangle Tool) (U) In Figures mode, draw a rectangle, as shown below, (slightly wider than red), the color of any. Select a tool " Add a reference point"(Add Anchor Point Tool) and add a point in the middle of the bottom width. Select a tool " Angle"(Convert Point Tool) and click on the point. Now tool " Arrow"(Direct Selection Tool) Move the point up, turned out to be corners.
Step 20.. Add a layer style to our tape
Gradient overlay \\ Gradient Overlay:
Stroke \\ Stroke:
Step 21.. Add shadow ribbon. Duplicate the "ribbon" layer ( Ctrl +.J.), Name the new "Ribbon Shadow" layer and rear it (click on the PCM on the layer and select from the "Rastrier layer" list) (Place the layer with a copy below the original), shift the "Ribbon Shadow" layer a little down and right. Apply layer style: Color overlay \\ColorOverlay. Apply 10 px. Change overlay mode Multiplication"(Multiplay) and opacity (OPACITY) for layer 75 %.
Step 22.. We deform the tape. We will make an active layer "Ribbon", Ctrl + T., click PKM and choose " Deformation"(Warp), hide behind the nodules to distort, as in the screenshot. Add the texture to the tape using the technique Step 15.. Change overlay mode (Blending Mode) for layer on " Multiplication"(Multiplay) and opacity (opacity) for layer 50 %.
Step 23.. Add the name of the brochure. Choose the tool " Text"(Type Tool (T)) and enter the word. Now in the menu Window \\ symbol (Window \\ Character) and in the Stop the following settings dialog box. Then turn the text layer on -15 °. Add a layer style:
Color overlay\\ Color Overlay
External glow\\ Outer Glow.
Inner shadow\\ Inner Shadow.
Step 24.. Repeat the previous step, write the word, but with a smaller font and place it on the bottom of the lane, apply the same styles. Turn the text layer on -5 °Change the settings for style Color overlay \\ColorOverlay
Step 25.. Create a new layer called "Shadow" below the "Stripe" group. Draw oval tool allocation Ellipse"(Ellipse Tool), color black and apply Filter \\ Blur \\ Blur over Gauss (Filter \\ Blur \\ Gaussian Blur), radius 20 RH, turn the ellipse on -15 °, change overlay mode (Blending Mode) for layer on " Multiplication"(Multiplay) and opacity (OPACITY) for layer 50 %.
Step 26.. Fill the brochure with content. Create Paragraph Text Layer for the "Person2" column, font ARIAL BlackThe color is black, the author added the name of the text, the settings below. Once you have created text layers (there should be three of them), turn them on -15 °. Do not forget about the boundaries - guide security.
Step 27.. We continue to add text. Note that the angle of rotation in the text layer "Contact US" -5 °. Create a group for each print area and place the text layers in them "Person1", "Person2", "Person3".
We are ready for the first side of our project. Save the document and name "BROCHURE - FRONT".

Party 2.
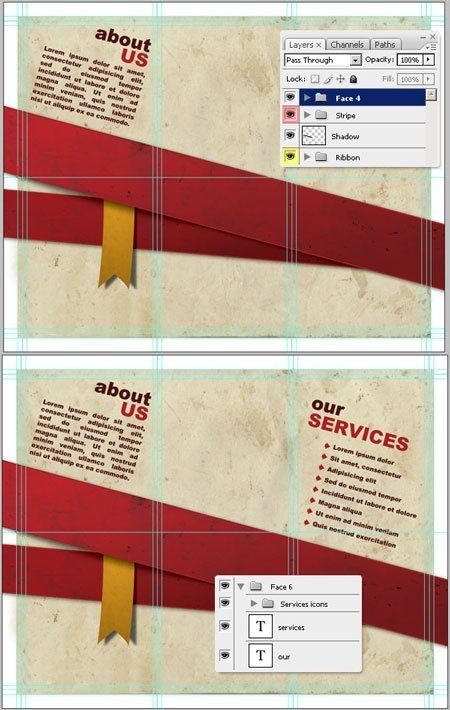
Step 28.. Hack or remove the "Person1" layers, "Person2", "Person3", leave only stripes and tape. Create three groups "Person4", "Person5", "Person6".
Step 29.. Select "Stripe Copy". On the menu Editing \\ Transform \\ reflect horizontally (Edit \\ Transform \\ Flip Horizontal) reflect the strip. Do the same with the "Stripe" group. Move the ribbon as shown below.
Step 30.. We continue to add text. Only the angle of rotation in this case should be positive, turn on + 15 °.
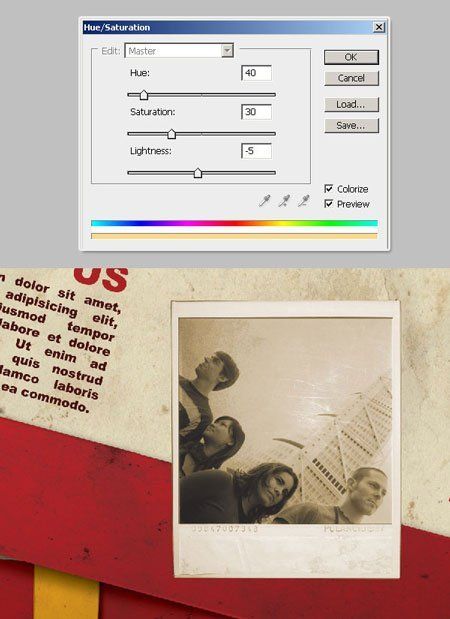
Step 31.. Add a picture, Polaroid frame, transfer to our document, let's call the layer "Polaroid" and put a layer in the Person group. Now insert any image into the Dark Rectangle "Polaroid" (add a layer mask). Lay the layer over the layer "Polaroid" and name "Picture", change overlay mode (Blending Mode) for layer on " Overlapping"(Overlay).
Step 32.. Drain the "Picture" and "Polaroid" layers in one and go to the menu Image \\ Correction \\ Color Tone / Saturation (HUE / SATURATION) ( Ctrl + U.), settings below
Step 33.. Add shadow to the image. Create a black rectangle on a new layer, position the layer under the "Polaroid" layer and name "Shadow". Press Ctrl +.F.To apply the "Gaussian Blur" filter with the latest settings. Change overlay mode (Blending Mode) for layer on " Multiplication"(Multiplay) and opacity (OPACITY) for layer 60 % And turn the layer with a shadow of several degrees to the right.
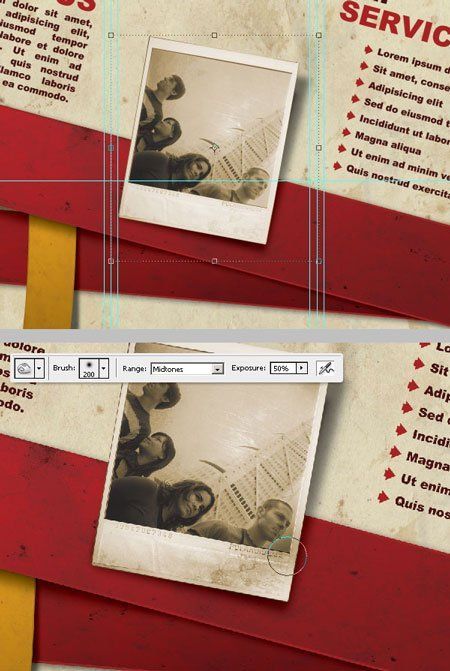
Step 34.. Latest strokes. Turn "PERSONNE" a bit to the right, select the tool " Dimer"(Burn Tool) and a little dimly some sites on our photo
Step 35.. The second side is ready.